Creating a Micro.blog Theme + Tailwind
- 6 min
After having messed around with Micro.blog for a while, I decided I wanted to have a go at building my own them. At first, the challenge seemed relatively easy as there were many other themes already out there, but I was soon to be proven wrong. Hopefully, I can steer you in the right direction to save you some time.
I further complicated things by wishing to style everything using Tailwind, this is optional, of course, but it did complicate things further.
Many thanks to Robb Knight, who's worked with me to understand some of this weirdness.
You might also find reading Colin Devroe's post about creating a Micro.blog theme useful.
1. Prepping your environment
Micro.blog is powered by Hugo, you will need to install that.
Once you've installed Hugo, create a new site and open that directory.
2. Getting the right version of Hugo
The first challenge was getting something running. There are some differences between Hugo and Micro.blog, and overcoming them proved annoying. The first thing to ensure is you have Hugo version 0.91.0 installed, anything newer, and you'll get issues with almost all templates relying on some RSS data that no longer exists.
Once you have the executable from the website, drag it into your site's main folder, this will allow you to run ./hugo for all other commands, and you'll have the correct version.
3. Getting your data
Go to your Micro.blog, go to 'design', and click on the 3 dots next to your domain name.
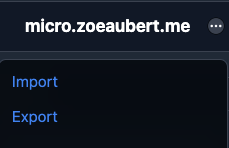
Once you get here, click "Export" and download your "Theme and Markdown" as a ".zip".
Once this has been downloaded, copy the content and data folder into your Hugo site.
If you have posts with photos, you will have to replace the URLs as they don't work correctly and won't have been downloaded. You can go through each post and add your domain to the front of each URL. For example, mine went from
uploads/2022/11510a1600.png
to
https://geekyaubergine.com/uploads/2022/11510a1600.png
If you want to cheat as I did, perform global replace on the content folder focus-within:
find: 'src="u'
replace: 'src="https://geekyaubergine.com/u'
4. Getting configured
From the data you downloaded before, you will need to take your config.json file and convert it to TOML. Once you've done this, copy it into your config.toml file.
5. Prepping your theme
I would recommend downloading the blank theme. This will give you all the required files, but you won't see anything. To fix that also download the default.
Thankfully Hugo is nice and allows you to merge themes, so import the blank theme into a 'blank' folder and the default into a 'default' folder. You can then add the following to your config.toml file (near the top as you'll want this again in a minute).
theme=['default', 'blank']
6. Validate your environment
At this point, you should be able to run and see your content with the default theme.
./hugo server
Congrats, now we can customise it.
7. Build your theme
Create a new theme using the following command.
hugo new theme <theme_name>
Inside your config.toml you can now add:
theme=['theme_name', 'blank']
You can now do what you want. I recommend copying files from either default or blank into your theme and then updating them as you see fit.
An example of what your theme might look like can be found on my repo.
8. Deploying your theme
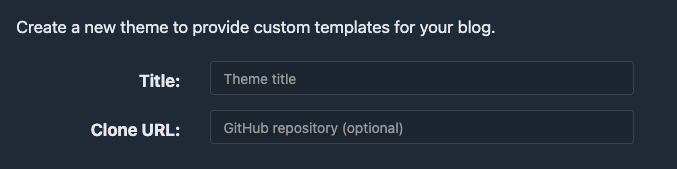
Now you have your theme and you're happy with it, let's deploy it. Firstly you need to push your changes to a public git repo. Then go to your Micro.blog and go to Design. Here you will find the Edit Custom Themes button, click this and click Create New Theme. It should look something like this:
Insert whatever name for the theme you like. One quirk of Micro.blog is that if you push changes to your theme's repo, it will not automatically update on Micro.blog. To remedy this, I strongly recommend you put some sort of version or timestamp at the end of your theme name to allow you to create new ones after each update. Then insert the https link to your repo, the ssh link will not work. It should look something like this:
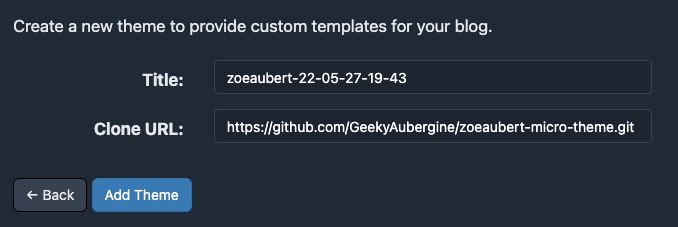
Click Add Theme, check your new theme is listed there correctly and go back to Design. In the Custom theme drop-down, you should now see your newly created theme, select it and then click Update Blog Settings , this will deploy your changes, though it may take a minute to process.
At this point, you might see an error appear on the Design page. If you do see if the error makes sense, it might be something requiring a file you've not committed (that's what happened to me), or you've got something in a {{ if hugo.IsProduction }} block that's causing an error you didn't see on your test site. Fix them and create a new theme as described above. If successful, the error might stay around for a while but eventually disappear.
Tailwind
Hugo doesn't support Tailwind out of the box, so we need to do our own thing.
I have an assets/css/styles.css file where I put all my styles.
You will need to have node installed and running. You're also going to want to install the same packages as I have. After that, copy and modify the postcss.config.js and tailwind.config.js.
You're going to have to have Tailwind watching to rebuild your css for Hugo as it can't do it, so run:
npx tailwindcss -i .https://cdn.geekyaubergine.com/css/styles.css -o .https://cdn.geekyaubergine.com/css/tw.css --watch --minify
In your templates/layouts/partials you're going to need something like this:
{{ $css := resources.Get "css/tw.css" | minify }}
<link rel="preload stylesheet" as="style" href="{{ $css.Permalink }}" />

{{ if not hugo.IsProduction }}
{{ $styles := resources.Get "css/styles.css" }}
{{ $styles = $styles | resources.ExecuteAsTemplate (printf "css/styles.dev.%v.css" now.UnixMilli) . }}
<link href="{{ $styles.RelPermalink }}" rel="stylesheet" />
{{ end }}
This tells Hugo to watch the file generated by Tailwind and ignores your non-compiled files in production mode. Congrats, that should be it.
Don't forget to have the tw.css file committed to your repo, otherwise, it won't work with Micro.blog. Yes, I also dislike having a generated file committed.
An example of what configuration might look like can be found on my repo.